Introduction
Photographing the sky or “astro-imaging” is surprisingly easy with modern digital cameras but getting started can be frustrating, even for experienced photographers because the techniques tools and jargon differ from those commonly used for everyday photography. This article is intended to help shorten the learning curve for capturing and processing astro-images.
What equipment do you need to photograph the sky?
The answer depends on what things in the sky you want to photograph. Amazingly beautiful images of the moon, stars and constellations can be made with nearly any digital camera and a sturdy tripod. To take detailed photographs of planets, dim galaxies and nebulae a telescope and special mount that moves to compensate for the earths motion during very long exposures are needed. For starters, the camera you already have, even if it is of the simple point and shoot variety, may do very well for some subjects. However, digital Single Lens Reflex (DSLR) cameras are more sensitive and much more versatile. They can be used to photograph almost any object that can be found in the sky. That includes the moon and planets, stars, constellations, galaxies, nebulae, satellites, comets meteor showers and more. Some of these objects are so large they require very wide angle lenses for adequate coverage while some are so small the magnification of a telescope is necessary. DSLR camera bodies can be attached to a wide variety of lenses and telescopes. As a result they are the ideal digital camera for getting started. So what lenses and/or telescopes do you need? I recommend starting with a standard lens such as the one that came with the camera. It will save a lot of time if you first learn how to find, focus, expose and process images taken with a moderate focal length lens before you try high magnification telephoto and telescope imaging of the dim “deep sky” targets. Zoom lenses can be used although fixed focus ones are usually somewhat better for getting the sharpest images of stars. In addition to the camera and lens, a sturdy tripod is essential to avoid vibration during the necessarily long exposures needed to capture dark sky scenes. A remote shutter release or interval timer to allow the shutter to be operated without jiggling the camera should be considered next. You can get along without one of these to begin with but you will likely find that a remote shutter release cable or interval timer makes life so much easier it is well worth having. Interval timers also make it easy to take a sequence of long exposures that are often needed when imaging faint objects. Once you have some experience with the above equipment adding a tracking mount and telescope is the logical next step and will open up endless possibilities for photographing deep sky targets. In addition to the hardware needed, image processing programs can greatly increase the scope of your astro-imaging experience. Some good choices include any of the versions of Photoshop, Deep Sky Stacker and Images Plus. DeepSkyStacker – http://deepskystacker.free.fr/english/index.html , is a freeware program that can produce first class results; ImagesPlus – http://mlunsold.com/ is an excellent commercial processing software package with extensive capabilities. For the most serious imagers PixInsite – https://pixinsight.com/ is an outstanding choice. The learning curve for these programs ranges from easy for DeepSkyStacker to fairly challenging for PixInsite with Images plus in the middle.
The camera settings some background
Before we discuss camera settings it is helpful to consider how images are formed by the light which strikes a camera sensor. Light may appear to flow continuously but it is made up of photons which arrive randomly in time and to some extent in position making the image slightly fuzzy. Scientists call this the “quantum” nature of light as each photon is a single “quantum” or quantity of light. There are so many photons in bright light we do not notice them as individuals. However when we make a photograph in very dim light the speckled appearance that comes from the random arrival positions of the photons can be apparent. The three images below have all been taken of the same object but with different exposure times.
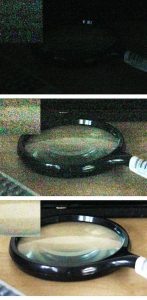
The top one received 1/16th and the middle ¼ as much exposure as the bottom one. Enlarged portions from the middle of each image in the upper right corners show the speckled appearance that results from the limited number of photons that reached the camera sensor but also due in part to electronic noise which is also a random process. It is common to describe both of these contributions to the speckle as “noise” although the photon number part (sometimes called “shot noise”) is not actually “noise” but a real feature of the image showing its quantum nature. Because the term “noise” is commonly used for both in the imaging jargon I will do the same in this article. Another noise source called readout noise adds its contribution when the sensor data is read into the camera’s memory card. Its effect along with that of the noise sources described above can be reduced but not eliminated during the calibration step of image processing to be described below.
Fortunately the randomness of both the photons that make up the image “signal” we are trying to capture and the noise we would like to avoid average out to some extent as their signals build up during the image exposure. This averaging takes place according to the square root of the exposure time. That is because exposing 4 times as long only doubles the randomness from the quantum effects and thermal noise while the signal (the precious image you want to get) increases in proportion to the exposure time. So exposing for 4 times as long makes the signal 4 times as intense while the speckle has only doubled. Therefore, better quality images (more signal compared to noise or higher S/N ratio) result when exposure times are increased.
Another way to increase the S/N ratio is to use a larger aperture or lens opening because this allows a greater number of photons collected in any given time. The ratio of focal length to the aperture diameter or focal ratio (f/#) of a lens or telescope controls how bright the image on the sensor will be. The area of the aperture increases as the square of the diameter, so an f/4 lens (or telescope) produces an image 4x as bright as an f/8 one.
Image format – RAW or JPEG?
DSLR cameras can be set to record images in either RAW or JPEG format. The file size is smaller in JEPG as a result of an image compression process. It is often used for ordinary photography because it works well for images that need little or no processing. However the dim subjects in astro-images may barely show up in unprocessed images that come out of the camera. They require “stretching” to brighten the darker parts of the image and allow the fine detail to appear. Unfortunately, this stretching also enhances ugly artifacts that were produced during the compression process to get the JPEG format. Images saved in RAW format are not compressed and can be stretched without loss of quality. For this reason, it is highly desirable to use RAW format for astro-imaging.
What does the ISO setting do?
IOS refers to a sensitivity standard for film. High ISO films have greater sensitivity than low ISO films. In the days of film photography it was possible to take pictures in low light using high ISO film but at the cost of greater “grain”, the film equivalent of noise in digital cameras. In digital cameras, the sensitivity of the image sensor is fixed and the ISO setting does not change it. When the ISO is raised, the signal (the image you want) and the thermal noise in the image are both amplified electronically by the same amount. In ordinary photography using the auto exposure setting, the camera adjusts the exposure time by shortening the exposure when the ISO is raised. It is the shortened exposure time and not the ISO setting that result in a more speckled appearance for digital camera images because fewer photons contribute. In astrophotography, the subject is usually very dim, and long exposures are commonly needed, limited only by the time available, sky glow, and the patience of the photographer. As explained above the signal from faint subjects can appear speckled even in the absence of thermal noise because it builds up randomly as individual photons arrive at the sensor. In very long exposures significant thermal noise adds to the speckled appearance and can easily overwhelm the faint details we wish to see.
In most cases, changing the ISO will not make images saved in RAW format better or worse.
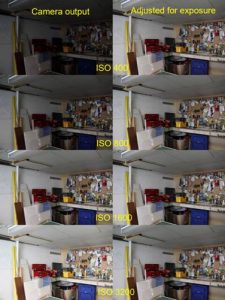
Processing always involves adjusting the intensity scale to get the same signal brightness and there is often little difference in quality of the processed images taken in RAW format for equal exposure times but differing ISO. The two sets of images shown below illustrate this. On the left are the images taken with differing ISO as they came from the camera. Those on the right were adjusted to compensate for the ISO setting. Even when these images are enlarged there is no substantial difference in quality.
That is for most cases. What are the exceptions?
Just as in any photography, you want to have the signal large enough that there is something to see above the black end of the intensity range and not so large that the bright parts go off scale at the top end. This can be challenging in astrophotography because there is usually an exceptionally wide range of intensity level between the brightest stars and the dim objects you are also trying to capture. You can get into trouble using too high an ISO coupled with a long exposure if the subject contains bright objects (stars or galactic cores) that become greatly overexposed. When that happens, the overexposed parts become blank white. In addition and often more importantly, the overexposed pixels can affect the surrounding ones by leaking some of their intensity out to their neighbors. The result is a “blooming” of the size of the bright object. Too low an ISO could also result in a loss of data if it is combined with a short exposure time such that there is not enough light collected to register any signal at all.
So, what combination of ISO and exposure time should I use?
A good rule of thumb is to expose each frame for as long as you can without tracking errors. Look carefully at your star images to check that they are round to check for mistracking. Then with the ISO set in the middle of its range expose an image and examine the histogram. if there is a sky glow peak near but not cut off by the left end the ISO setting is good. If the peak runs into the lower limit raise the ISO and if it is quite far right of the left end lower the ISO. Then take enough frames to give the total exposure time you need. How many that is depends on how dim the target is but in general, the more frames the better.
How does stacking several frames help?
Recall that image quality depends on the exposure time but as we have seen above exposing for too long may result in serious overexposure of parts of the image. To get the best of both worlds you can set the exposure of individual image frames to keep the overexposure in check and take many frames to get as long a total exposure as needed. The individual frames can then be combined together to achieve the effect of one long exposure trough a process called “stacking” using readily available image processing software. Stacking programs are normally set to use an averaging method so the bright parts do not get any brighter for a stack than they were in a single frame. There is however an improvement in quality because the averaging smooths out the randomness allowing detail in the dimmer parts of the image to come out. The improvement increases as the square root of the number of frames that are combined.
Is there any disadvantage to using short exposure times?
There is some extra noise added every time an image is read out so a stack of several images will have a bit more noise than a single one. That is why it is recommended to use the longest exposure you can without tracking errors. However, the contribution of this noise is normally much smaller in DSLRs than the nose that accompanies the exposure. As a result, there is not a big disadvantage with short exposure times for the individual frames provided enough are taken to give enough total exposure. Below is a comparison of 3 images and a blown up portion of each. All were taken in very dim light similar to that of a moderately dark night with the same f/4 focal ration using a Canon T3i camera and 200mm lens. At the top is a single 30 second exposure at ISO 1600 and f/4. In the middle is a single 240 second exposure at ISO 200 and f/4 which gives the same image brightness. Finally there is a stacked image of 8 – 30 second exposures at ISO 1600 and f/4. All were processed identically in photoshop.
There is a significant improvement in the 300 sec. image (middle) over the 30 sec (top). The stack of 10 – 30 sec. images at the bottom has very slightly lower quality than the 300 sec one but is still quite good. So, while there is some advantage to using longer exposures, many short exposures can give almost as good results provided the iso is set to give the same image brightness.
Calibration, Light, Dark, Flat and Bias frames
It is possible to “Calibrate” images using Light, Dark, Flat and Bias frames to partially correct for noise, vignetting and dust on the sensor. Light frames are the ones taken of the subject. Dark frames are exposed for the same time and at the same temperature as the Light frames but with the lens covered. Using the same temperature is important as noise is quite temperature sensitive. When the temperature and exposure time of the darks is the same as that of the lights the average noise in each is the same so the darks can be used to remove the average value of the noise. Note that the random part can never be completely removed but can be reduced by taking many dark frames which are averaged in the calibration process. Just as with light frames the more darks the better especially if your camera has a lot of dark noise. Flat frames are short exposures of blank areas such as a featureless clear sky. They should be exposed to give a nice peak about 2/3 of the way up in the histogram. Flats contain the same vignetting and dust spots that are in the light frames so that these artifacts can be removed in the calibration process. Because they are taken in relatively bright light fewer flat frames than lights or darks are needed. Bias frames are very short exposures with the lens covered to sample the readout noise. It is a good idea to take lots of these so the random nature of this noise can be reduced through averaging in the calibration process. Programs such as Deep Sky Stacker or Images Plus can be used to combine dark, flat and bias frames to make master light, flat and dark files and use them to “calibrate” the light frames.
Is there any way to avoid the noise altogether?
Both the noise that builds up during the exposure and the readout noise both are caused by heat. It is possible to reduce that noise by cooling the camera and cool nights can help as well. High end cameras designed for astrophotography have coolers built in for this reason. Some amateur photographers have designed coolers to use with DSLRS but using them can be tricky because cooling also raises the possibility of dew formation since the sensors are not isolated from the surrounding atmosphere.
What else can go wrong?
Three things that often give difficulty in photographing dim objects are mistracking, vibrations and lack of sharp focus. Mistracking can result from imperfect polar alignment and/or instabilities in the mount. Vibrations arise from shutter clanking, wind and, in the case of high magnifications even the ground shake when the photographer is moving around.
Good Luck!
Astrophotography is a challenge but it is also very rewarding. Good luck with your imaging and clear skys.
I am grateful to Bruno Quenneville, David Lee, Joe Carr and Charles Banville from the Victoria Center of the Royal Astronomical Society of Canada for helpful comments and suggestions.
W. John McDonald, Victoria Center, RASC © 2017 W J McDonald